

How to Print on Transfer Paper? A Complete Guide
If you are from the textile, printing, art, or any printing business, you must have known about one exquisite item that plays an essential role – transfer paper.
It is generally a thin piece of paper that comes coated with high-quality wax and desired pigment. They are effortless to use and versatile enough to be used in multiple projects.
You can find a broad range of transfer papers, but first define your goal, and the purpose for which you need to purchase the paper, and then use it properly to create designs. Moreover, it is very cost-effective.
In the heat press machine, transfer paper is used for printing the image or design so you can transfer it onto a substrate (t-shirts, mugs, canvas, tiles, pads, etc.). Another use of transfer paper is in creating iron-ons. It seems compatible with transferring any text, image, design, or graphic.
Using transfer paper in a heat press machine ensures a high-quality print. But it needs careful application and monitoring if you want to experience professional-quality outcomes.
Types of transfer paper
There are two types of heat transfer papers.
Light Transfer Paper
The white background is always the first choice when you want your ink/printed design to be strikingly visible. Colorful prints on white or lighter backgrounds tend to show the precise colors sharply and accurately.
Light papers are carefully crafted to be thin. It is best used for printing on light-colored or pale shirts. But, it must never be completely white. It can be pink, beige, peach, yellow, light grey, or paler tones, or any light-colored fabrics.
For printing, if you use light transfer papers, you typically print the image either in reverse or in a mirrored way. After putting the printed side of the transfer paper on the substrate, with the chosen image facing down, the next step is to put the unprinted side of the transfer paper on the substrate. The backing sheet’s back part must be directed toward you.
Once everything is positioned, apply pressure and heat. It works on the “hot peel” mechanism.

Dark Transfer Papers
Choosing the darker backgrounds is a sensible option if the ink is of a lighter color and the fabric is brighter, saturated, black, or dark gray. If not, the design will get vague and become difficult to see or read. Using dark-colored ink on dark transfer paper will make your design completely imperceptible.
Dark papers are comparatively thicker and appear opaquer. Opaqueness helps prevent the original fabric color from appearing or reflecting through the image. They are slightly sticky.
While using dark transfer paper, you print the image on the positive side, like you usually do when printing on any paper. Never use dark transfer paper to print in reverse. It works on “cold peel” transfer.
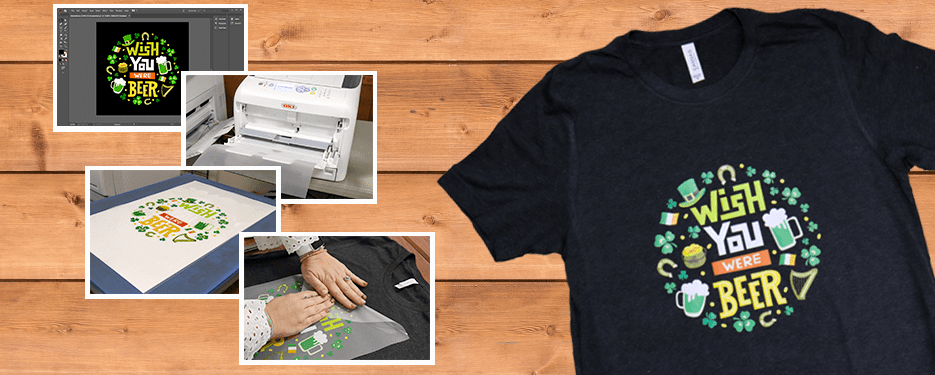
How to Print on Transfer Paper?
Create your design
Start making graphics using design software or a design program. It comprises any image, creative artwork, writing, letter, or logo. Use computers and software to create impressive designs.
The best options are Adobe illustrator , Corel-draw. Cricut Design Space, and Silhouette Studio.
You can also buy ready-made designs that are available in PDF, SVG, PNG, JPG, and AI formats. You can buy these and modify them according to your preferences.
Reverse it
Don’t forget to reverse the design before printing if you’re printing on light paper. You can do so by using options like rotating horizontally.
Printer settings also allow you to mirror your design. However, do not choose this option if you have already mirrored your design in graphic design software.
Select The Right Paper
In the market, transfer paper of multiple types is available. Typically, the item’s color determines the model, color, style, and size of the paper.
- Inkjet transfer paper for inkjet ink and printer.
- Laser transfer papers for laser printers.
- Heat transfer vinyl (pre-made. Cut out your design, paste, and print)
Print the image
It is time to shift your design to the transfer paper. Always print your design on the wax-coated side.
Select the highest dpi option in the printer settings. Some printers also allow you to choose the options like t-shirt transfer. Otherwise, you can choose coated paper or glossy paper settings.
Now you are ready!
Choose a sublimation printer if you are printing using sublimation ink. Otherwise, an inkjet printer can print on the transfer papers.
Select your item
To get the best quality image, you must get the right kind of item surface for printing. Always remember, every item/fabric is not heat-sensitive, and every item/fabric is not heat-resistant.
It is equally important to avoid using fabric that is not heat-compatible such as synthetic materials. The most common and safe picks are Cotton, spandex, and polyester. You can use this time and temperature chart for the best results.
You should make sure that the surface is neat and clean. You can use a lint roller for this purpose. Preheating the surface is also a good practice.
Set the Heat Press Machine and transfer the design
Always choose the best heat press machine that fits your needs, is practical, and is made well. The two most important aspects of the machine are size and design/layout.
A multifunctional heat press machine can be more beneficial as it will serve several functions. Keeping the project in mind, pick a device. Also, look for other specs such as pressure, time, temperature, digital control, alarm, safety features, etc.
Where styles and designs matter, unique features also matter. If you are a hobbyist, choose the swing-away heat press product. It is more versatile. Similarly, a small machine works better for smaller designs and images, such as letters. Choose a larger machine for larger designs and projects. Usually, there are three sizes to pick from:
- Small
- Medium/Standard
- Large surfaced
Prepare your heat press machine and set the time, temperature, and pressure as needed. Always keep the settings suitable for the fabric type. It is advised to read the manual first.
Put your transfer paper and garment on the platens. If the Teflon paper is not coated on the plate, place one on the shirt. Switch on the machine to let it transfer the design safely.
Alternatively, you can use a sublimation oven or a good household Iron if the design is small and does not require extreme pressure.
How to print on transfer paper From Word?
Instead of designating using graphic design software, you can also create a design on word for transfer paper printing, but the real problem lies in reversing or mirroring the image. Ways To Reverse Text For Transfer Paper Printing include:
- Choose the printer with the option of printing the design in a mirror or reverse mode. It usually pops out when you select the “print” option.
- While designing, within MS word, flip a text box in word creating the mirrored image for print adjustments. It is done by selecting the “Format Shape” option.
- Once you have designed your print, export the file to Another Program such as paint. Save your Word document in a compatible format. Then, use another program to mirror, rotate or reverse it. You can use Microsoft Publisher, as well.

How to print on transfer paper For tattoos?
For tattoos, you need to print your design on transfer paper, which could be done either with an inkjet or laser printer. For the dot matrix printer, carbon transfer paper can also be workable.
Once you load the image or design you have chosen to be tattooed on a PC, test print it. Check if the design is of the right shape, size, and placement.
Typically, a thermographic type of paper is used for transferring the tattoo design directly onto your skin. In some instances and projects, printable tattoo transfer paper can help you out.
- Layout your tattoo design with a pencil
- Slide your original design beneath carbon paper
- Put the whole set of papers through a thermographic transfer maker.
- Exclude the top carbon copy
- Place the carbon copy where the tattoo needs to be printed.
- Wet down your skin using soapy water
- Press the carbon copy down onto the skin
- Get rid of the carbon copy.
How do I print on transfer paper From a laser printer?
- Create your design on a paper
- Shift it to the computer
- Refine your design with software
- Once done, save it in a compatible format and connect it to your printer.
- Put the laser transfer paper inside a printer and press the PRINT button.
How to print on transfer paper For dark shirts?
It is done similarly to the steps mentioned earlier, but all you have to be careful about is the type of fabric, type of transfer paper, and type of printers you are using. They all must be compatible. If you are using a laser printer, use laser transfer paper for transferring prints. For inkjet printers, use inkjet transfer paper.
Transfer paper usually lets you print images, letters, or texts on almost every fabric and many other surfaces.
Although, for a dark t-shirt, you must use dark transfer paper to avoid any inconvenience.
How to print on transfer paper For wood?
First, decide what type of printing method you are choosing. You can choose from heat transfer, gel medium, or Acrylic Poly transfer. Move on to the printer you must be using.
You can use inkjet, color laser, and LaserJet printers. Now, you must keep in mind whether you want to decoupage or transfer an image. It will affect your decision of getting crispy sharp or an old-inspired, vintage photo. Then, the question comes about the background. The options are: transparent and opaque.
Once you have reversed the image, make the wood surface as smooth as possible to avoid inconvenience. Use fine-grit sandpaper for extra silky finesse. If you are cutting the design first, always leave a little white border, giving your fingers a place to rest.
In case of directly transferring to the wood (with wax /freezer paper and blender marker methods), use as much force as required with the burnisher.
Common Mistakes when using Transfer Paper
- Forgetting to reverse or mirror the design/image before putting it on the transfer paper
- Printing on the backside/opposite side/non-coated side of the transfer paper
- Choosing the inappropriate transfer paper considering the fabric color and type
- Failure in setting the correct temperature/heat, pressure, and time
- Don’t get bothered about running a test on prints and paper first.
- Not selecting the suitable heat press machine.
- Washing or rinsing shirts sooner ruins the quality
- Low-quality inks are used for printing.
- Incorrect setting of design and garment or faulty printers
- Unclean cutting of design on transfer paper
- Forgot to remove the backing.
- Not pre-ironing the shirt.
FAQs
Can You Print On Transfer Paper With A Normal Printer?
No, absolutely not! You cannot use any printer for printing. It needs to be compatible with the transfer paper. For instance, for an inkjet printer, you must use inkjet transfer paper. Similarly, for laser transfer paper, you should be choosing the laser printer. For sublimation transfer paper, choose a sublimation printer.
What Type Of Printer Do I Need To Print On Transfer Paper?
You need the following printer type and printer ink:
- The inkjet printer for Inkjet transfer paper
- Laser printers for Laser transfer papers
- Sublimation printer for sublimation transfers
What Side Of The Transfer Paper Do I Print On?
Always print on the wax-coated side of the transfer paper. If you fail to recognize this printable side, you will get a poor design transfer, appearing vague, unclear, spotty, blotchy, and washed out.
Talking about the inkjet printers and papers, you must print on the dull (uncolored) side.
Can You Use Wax Paper As Transfer Paper For Shirts?
Yes, because technically, the transfer papers come coated with wax. Using wax papers as transfer papers can help you customize your clothing and seems compatible with almost every fabric item. Wax paper can transfer your printable image to any material quickly. Wax papers work best with wood. You can start by cutting a piece of wax paper to the size you need for the project and design.
Does Transfer Paper Wash Off?
Usually, the transfer paper is made solid and reliable enough to last 7–10 washings if a home iron is used. But if you are using a heat press, it will last 10–15 washings easily.
What Can You Use Instead Of Transfer Paper?
One of the safest techniques is to use parchment paper. It is an economical alternative. Simply put, you can take advantage of wax/tracing paper. Besides, baking parchment paper comes with a soft, waxy coating, allowing the image to transfer effortlessly and without daubing. Clear shelf paper will also work.
How to reverse an image to print on transfer paper?
You can reverse the image by using the rotate option in your editing software. You can also reverse the image in the printer settings. Make sure to avoid reversing the image in printer settings if you have already done it in the editing software.
How to use heat transfer paper?
Print your design on the dull side of the heat transfer paper. Cut the extra space around the design. Use a tape to keep the transfer paper with the fabric. Finally, apply the heat and pressure.
How to transfer photo to fabric with wax paper?
To transfer a photo to fabric using wax paper, you need to print the image as a reverse image on an 8.5 x 11-inch wax paper sheet. Cut the wax paper and use tape to adhere it to a regular 8.5 x 11-inch sheet of paper to prevent jamming in the printer.
Print the image directly onto the wax paper sheet and place it face down on a slightly dampened hard surface such as wood.
Burnish the image with a credit card or other flat edge using equal pressure, and then carefully remove the wax paper.
Allow the ink to dry and then sand, paint, or seal the surface as needed.
Are there transfer papers that don't print background?
There are special transfer papers for white and dark shirts. However, all leave a white background. You can avoid this by removing the white section through a vinyl cutter or you can trim by hand.
5 Best vinyl heat press machines
Additional Questions
Can you print directly on transfer paper?
Yes, absolutely. Most standard Inkjet printers are compatible with transfer paper and you don’t have to make any alterations to your equipment for it to work. It’s as simple as feeding the transfer paper into your printer as if it were regular paper. Many people have a suitable Inkjet printer at home or can easily access one at a local print shop or office. So, printing directly on transfer paper is not just possible, it is also straightforward and accessible.
What setting do you print on transfer paper?
Once you have your Inkjet printer and transfer paper ready, it comes down to setting the right print settings. However, there isn’t a universal answer to this as it largely depends on your specific printer model, the type of transfer paper you’re using, and the nature of the image you’re transferring. You might need to adjust the print quality, paper type, and color options, for instance. Often, you can find specific instructions on the transfer paper packaging or the manufacturer’s website. Your best bet is to conduct a trial run, to ensure that you’ve got everything set up correctly before proceeding with the final project.
How do you use transfer paper instructions?
The process to use transfer paper can be broken down into a few basic steps. First, choose the image that you want to transfer. Then, print this image onto the transfer paper using your Inkjet printer. Once printed, allow the ink to dry completely before moving onto the next step. Next, place the transfer paper onto the material to which you want to transfer the image. This could be a shirt, a bag, a piece of fabric, or any other material. Use a heat press or iron to apply heat to the paper, which releases the ink from the paper and onto the material. The specific heat settings and time will depend on the types of materials you’re using, but the transfer paper instructions will usually guide you. Remember, you must follow the instructions carefully to ensure a successful and long-lasting image transfer.
Do you print on the line side of transfer paper?
When printing onto transfer paper, you must print on the correct side. Normally, you will want to print on the dull (uncolored) side of the paper. The shiny side which has a color tint should not be printed on. Make sure the paper is flat and without any bends or curls, especially at the leading edge that will go into the printer first. An important point to remember is that the image you print will be mirrored when it is transferred onto your fabric. So, if your design includes text or a specific orientation, you may need to mirror the image before printing. By choosing the right side to print on and remembering to mirror your design, you’ll achieve a great result with your transfer paper project.

I’ve been in the printing business for 25 years. I love to share my experiences and knowledge.