

How to Make Plastisol Transfers With a Heat Press Machine?
Plastisol is a rubber ink that coats a fabric with a hard and durable finish. It is one of the most popular inks because it has good adhesion to cotton fabrics, has good durability, and has a nice soft feel. You can buy it premixed, or you can create your custom color by mixing four different colors. We usually use it in screen printing.
What is plastisol heat press printing?
Plastisol heat press printing is a process where the ink and garment are heated to the point where the ink melts and binds to the fabric. This is one of the most common type of printing in which the ink and garment are pressed together by using heat and pressure for a brief time.
How to make your own plastisol heat transfer?
Here is how to make a plastisol heat transfer:
Supplies: Plastisol ink, design, heat transfer paper, Squeegee, Screen printing press, emulsion, a curing unit, and a heat press machine
Create your design
Choose the design you want, or create one using a computer. If you’re designing your own, make sure to consider how Plastisol ink gels as it cools and whether your design will be clear and legible in the final product.
You should keep in mind that there should be no fine lines and larger patches of solid colors. Keep lines thicker than 1/16 inch.
Remember to create a mirror image of your design, because when the transfer is applied, it will be flipped over.
Select a plastisol ink
Select a plastisol ink. They come in a variety of types and can be found at most screen printing stores.
When printing a transfer design, you want to use specially formulated ink for this process. If you add an adhesive powder too, then it’ll be much easier to apply.
Prepare a stencil of the design
Make a stencil of the design and place it on the mesh part of your screen printing press. The procedure is a bit different depending on the type of press you have but generally involves painting an outline of the design with non-reactive ink first.
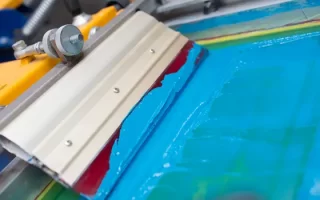
Select a mesh and apply plastisol ink
The mesh should be approximately 3-6mm and have 86-120 stitches per inch. Apply the Plastisol ink to the mesh. There are many different techniques for how to apply it, but in most cases, you will fill a reservoir with ink and then draw the fill bar across the mesh to spread it around.
Press the design to heat transfer paper
Using a squeegee, press the design onto the transfer paper. Be sure to print on the coated side of some heat transfer paper, although always check the packing first. If you are applying multiple layers of color, apply the dominant color or the black outline.
If at all possible, avoid using more than one color in your art, otherwise there is the risk of ink not drying evenly.
Cure the transfer
Cure your transfer. You can get the best transfers by curing evenly. Blow dryers or other small heat sources produce uneven curing and should be avoided. If you’re looking for a good curing unit, a commercial dryer such as a conveyor dryer is your best bet!
The temperature will vary based on what type of ink & paper you’re using but is usually between 180-250 degrees Fahrenheit.
Ensure your ink is within the range of temperatures before curing it. Failure to do so might result in undesirable results. Once the ink is cured – which only takes a few seconds – you’re ready for application.
Heat press it
We suggest turning your heat press up a little higher than the desired ink curing temperature. For inks that cure at about 260 F or 270 F, we recommend heating the plastisol to about 290 F-300 F. For standard inks, set your heat press to 330 F-350 F.
Heat pressing it for 10-12 seconds by applying medium pressure.
To apply on the garment, press firmly onto it and continue to do that for 10 seconds. Once you reach 10 seconds, remove the paper for hot peeling or let it cool down before attempting to peel off if it is cold peel/
To ensure your surface has reached a proper cure, always perform a wash test to confirm adhesion.

FAQs
What is the difference between plastisol and water-based inks?
Plastisol inks are made from a combination of PVC, plasticizers, and pigments. Water-based inks are made from a combination of water and pigments.
Plastisol inks require heat to set the ink and are more durable than water-based ink.
On the other hand, Water-based inks are not durable and will eventually fade.
What are the advantages of plastisol heat press printing?
The advantages of plastisol heat press printing are that it is cost-effective, fast, easy to use, and it provides a durable finish.
What are the disadvantages of plastisol heat press printing?
The disadvantages of plastisol printing are that the colors are not as vibrant as they are with solvent printing. It is also more difficult to apply a gradient effect, and the heat-setting process can damage some fabrics.
Is plastisol heat transfer good for t-shirt printing businesses?
Plastisol heat transfers are a good option for t-shirt printing businesses. They are popular for the unique feel and texture they add to the printed design.
How to cure plastisol ink with a heat press?
To cure plastisol ink with a heat press, you will need to heat the ink to a temperature of 270-330 degrees Fahrenheit, depending on the type of plastisol ink used, for about one minute. Ensure that the ink is evenly distributed and that you don’t overheat the fabric.

I’ve been in the printing business for 25 years. I love to share my experiences and knowledge.